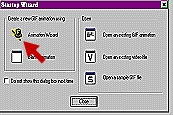
 Now
that you have all your frame's you need to go to the Animator. When you bring up
the Animation window you will see a box of options.
Now
that you have all your frame's you need to go to the Animator. When you bring up
the Animation window you will see a box of options. Birdbox
tutorial
By Linda
Jacobs
Page 3
Now
that you have all your frame's you need to go to the Animator. When you bring up
the Animation window you will see a box of options.
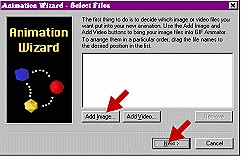 Click
on Wizard. You will get another box of options. Click on add image and go to the
file where you saved your frame's and add each one of them, stating with
first-frame, frame-1, frame-2, and so on to last-frame.
Click
on Wizard. You will get another box of options. Click on add image and go to the
file where you saved your frame's and add each one of them, stating with
first-frame, frame-1, frame-2, and so on to last-frame.
 You
should now have every frame in the box in order. Click on the next. Change
source type to
You
should now have every frame in the box in order. Click on the next. Change
source type to
Photo-oriented, click on next.
On the next screen change
the delay to 20 and click on next and then on finish.
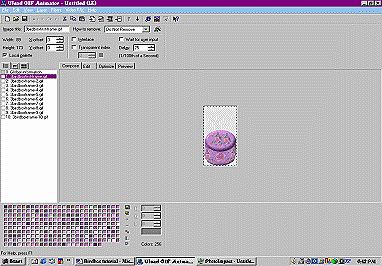 Now you
will have something like this facing you.
Now you
will have something like this facing you.
Now where the bird starts to move you might want to add these
frames again, to make the moving longer. Just go to add image at top tool bar.
Click on it and go to the file where your frames are stored and starting
with
the frame-# that is for the first movement click on it and so on just like you
did in the Image file window, at the beginning. Highlight
the frame that you want the new frame to follow and it will be put in there
where you want it. continue this until you have all the movement frames
in.
Now start at first-frame and highlight it then go to transparency, to make the background transparent: On the left of the screen you will see each frame listed. Click on the name of the first frame. On the menu bar, click the Transparent Index box (see figure below). Click in the small color box (it will be black) to select it, then move the cursor to your image. It will turn in to a dropper, (the cursor) click on the white background. On the attribute bar, locate "How To Remove". From the dropdown menu, select "to background color". This completes the transparency for the first frame.
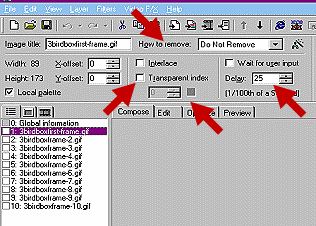

Repeat the above procedure for each frame. Then after you have done the transparency you might want to change the delay a little for each frame. Now the new frames you added after you had already went though the select files will only be about 10 on the delay so you will definitely want to change these.
Saving your Animation using the Optimization
Wizard
Located under the file menu. On the first screen, select Yes to
control the number of colors used in global palette - Next
On the next screen, enter 256 colors to get the best color - No -
Next
On the next screen, select Yes and Yes - Next
Select Finish.
Now depending on the size of your birdbox and all will make a difference on the optimization, but this will never be a little file especially if you decide to add sound so be careful who or where you send it.
When the optimization process is finished, select Save As and save
your Image as a .gif file. When you close the animation window, a box will pop
up asking if you want to save changes to untitled image - click no.
That's it - I hope you enjoyed this tutorial and enjoy seeing your animated birdbox!